

Signup forms are annoying. You know it, your users know it — another email, another password to invent and immediately forget. And that friction adds up: plenty of visitors will just close the tab rather than fill out one more form.
That’s the problem Google Login solves. Instead of forcing people through your own registration flow, you let them sign in with an account they already use every day. One click, no new password, no mental overhead.
This tutorial walks through adding Laravel Google Login to a Laravel app using the Laravel Socialite package — from setting up OAuth 2.0 credentials in Google Cloud Console to wiring up the callback that actually logs the user in. By the end you’ll have a working “Login with Google” button, and I’ll flag the couple of gotchas (redirect URI mismatches, mainly) that trip people up the first time.
Let’s start by creating a new Laravel project.
1. Create a New Laravel Project
Navigate to C:\xampp\htdocs, where the XAMPP server has been set up, and execute the following Composer command:
composer create-project laravel/laravel laravel_shopping_projectThis command will create a new Laravel project and a directory named laravel_shopping_project inside the htdocs directory.
2. Install Laravel Socialite Package
Install the Laravel Socialite package by running the following command:
composer require laravel/socialiteThe Laravel Socialite package provides a simple interface for OAuth authentication. It allows your Laravel application to authenticate users through third-party services such as Google, Facebook, LinkedIn, and other supported providers.
3. Configure Google Credentials
After installing Socialite, register Google as a third-party authentication service in your Laravel application.
Open the config/services.php file and add the following Google service configuration:
'google' => [
    'client_id' => env('GOOGLE_CLIENT_ID'),
    'client_secret' => env('GOOGLE_SECRET_KEY'),
    'redirect' => env('GOOGLE_REDIRECT_URI'),
],
These values will be read from your application’s .env file, which we will configure below.
4. Set Up Google API Credentials
Now we need to create Google OAuth credentials that will allow users to authenticate with their Google accounts.
To create the required credentials, follow these steps:
-
Go to the Google Cloud Console.
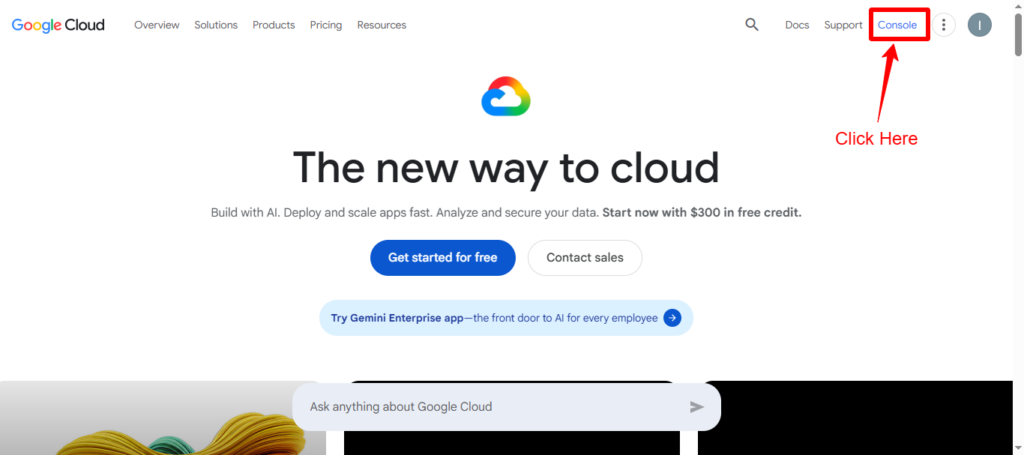
Screenshot 1: Google Cloud Console
-
Create a new Google Cloud project and give it an appropriate name, such as Laravel Shopping Local Project, or whatever suits your project objective.
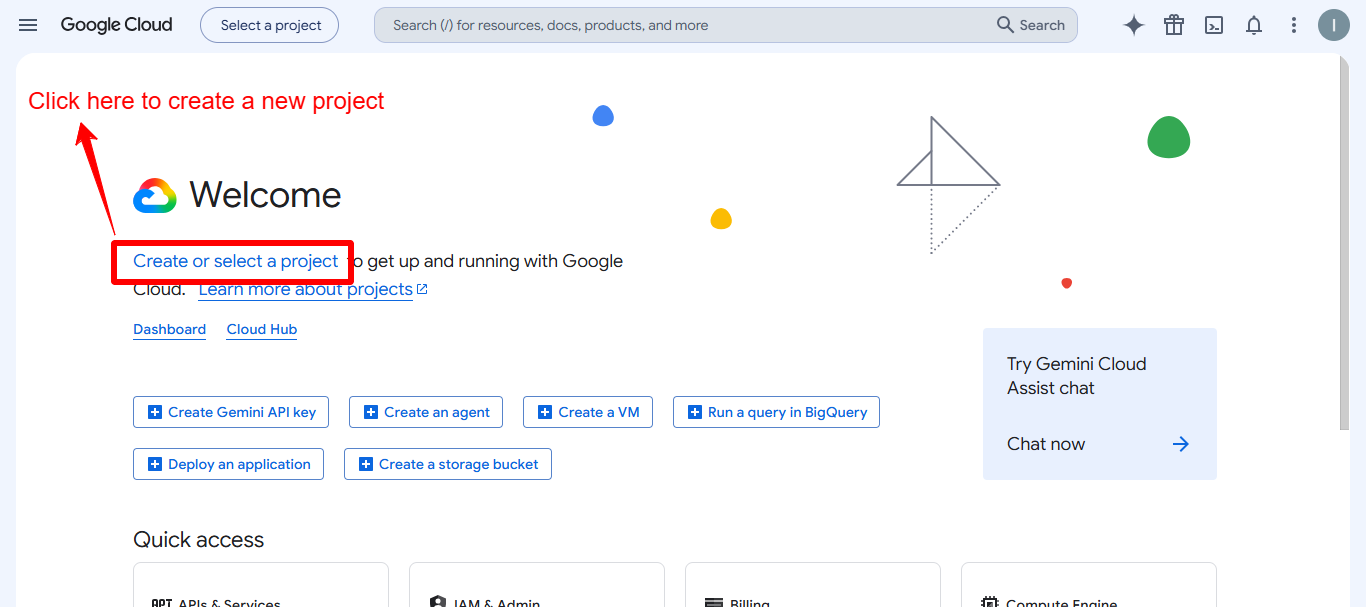
Screenshot 2: Create a new project in Google Cloud Console
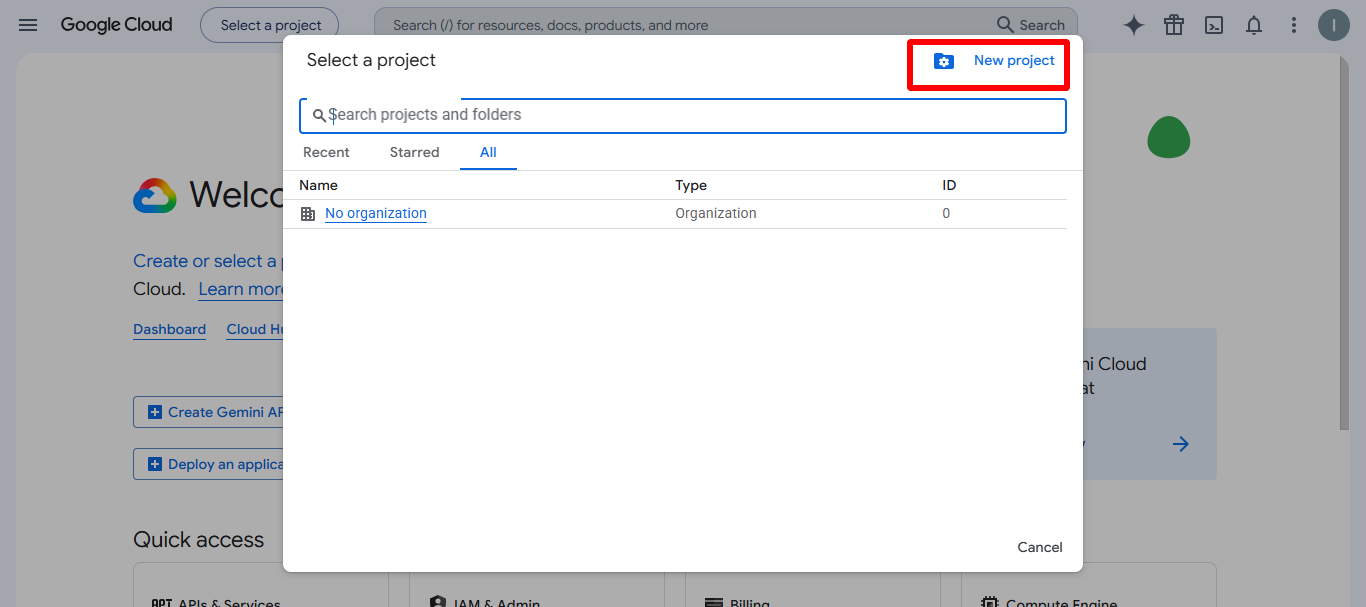
Screenshot 3: Google Cloud Console – Project creation screen
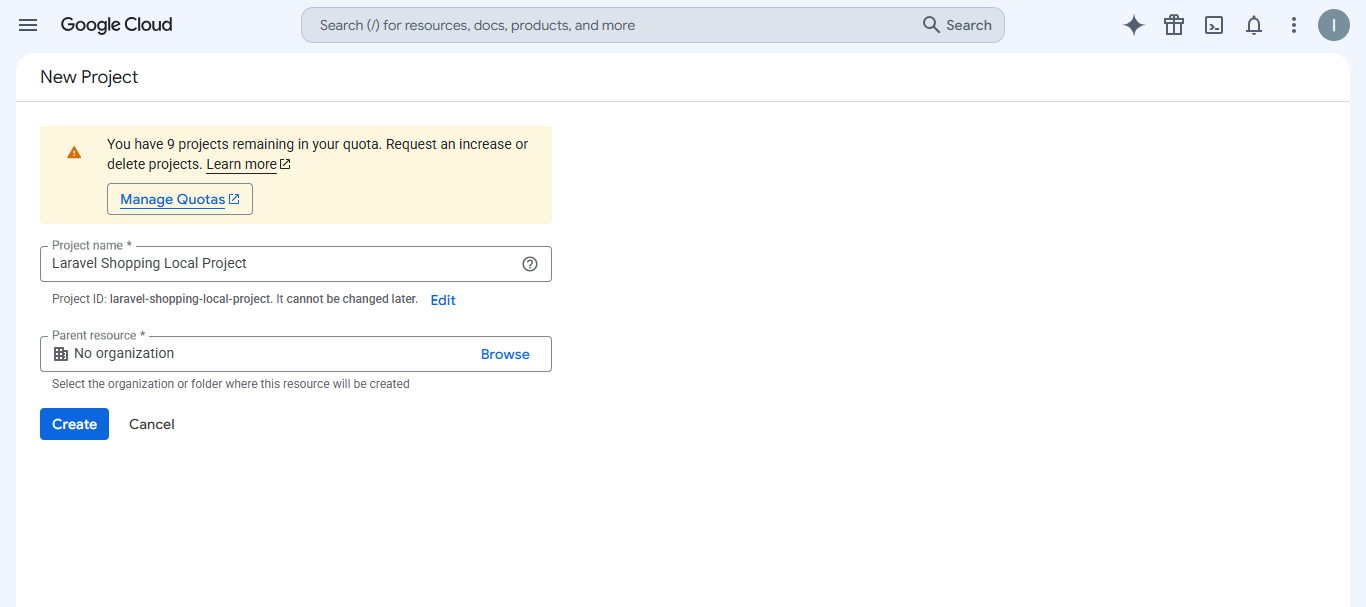
Screenshot 4: Enter a project name
-
Navigate to APIs & Services and open the Credentials section.
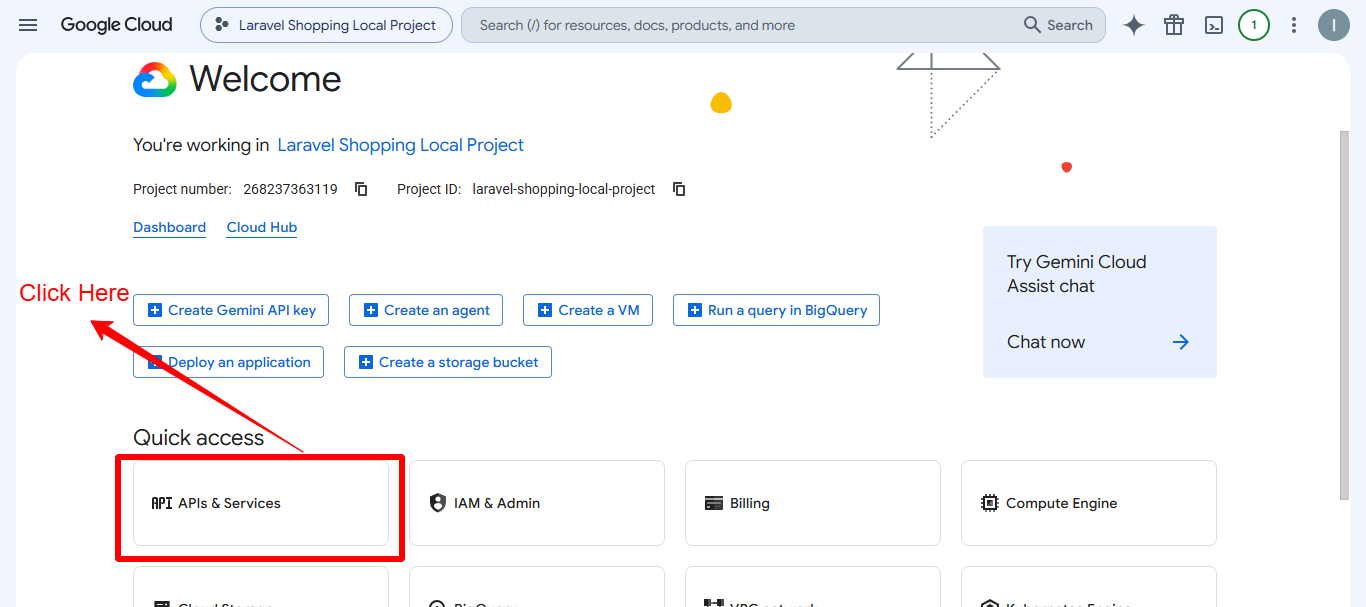
Screenshot 5: APIs & Services
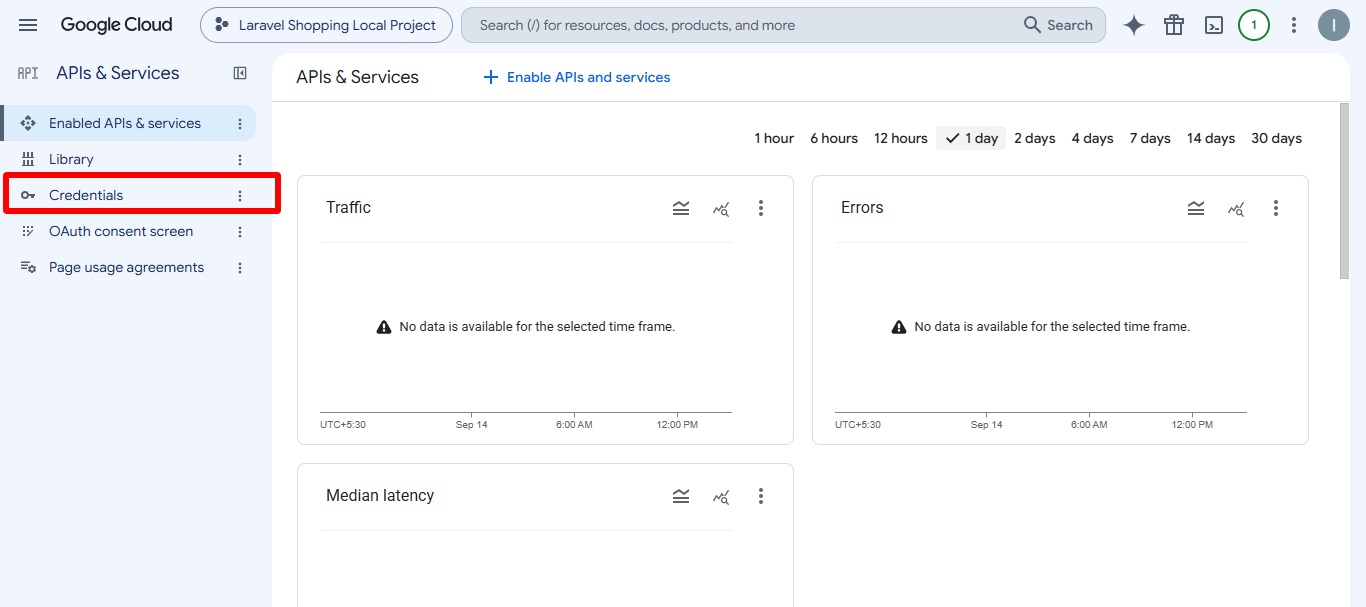
Screenshot 6: Open the Credentials section
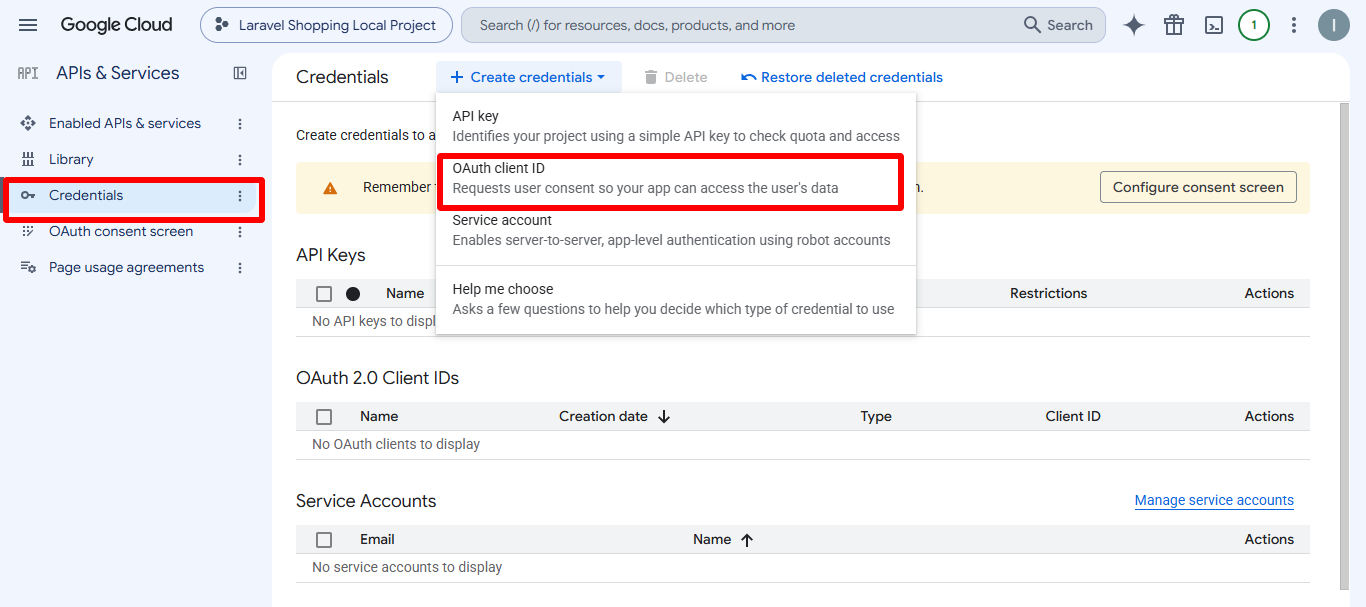
Screenshot 7: Set up an OAuth Client ID
-
If Google asks you to configure the OAuth consent screen, provide the required application information and configure the consent screen according to your application.
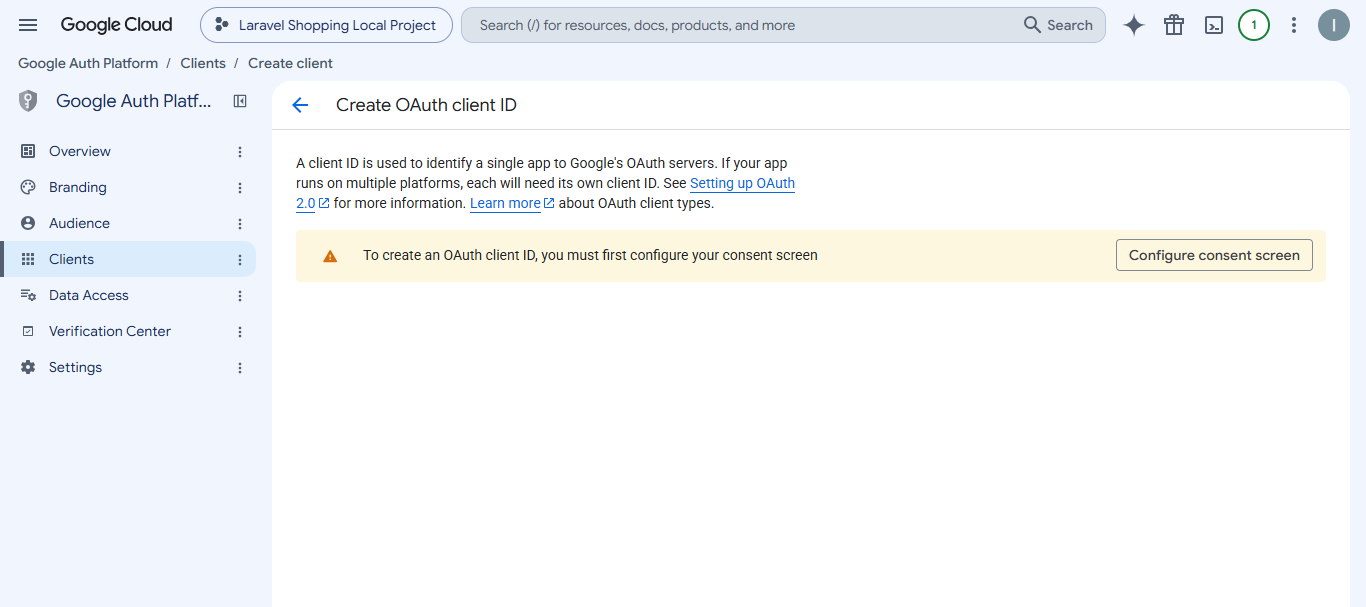
Screenshot 8: Configure the OAuth consent screen
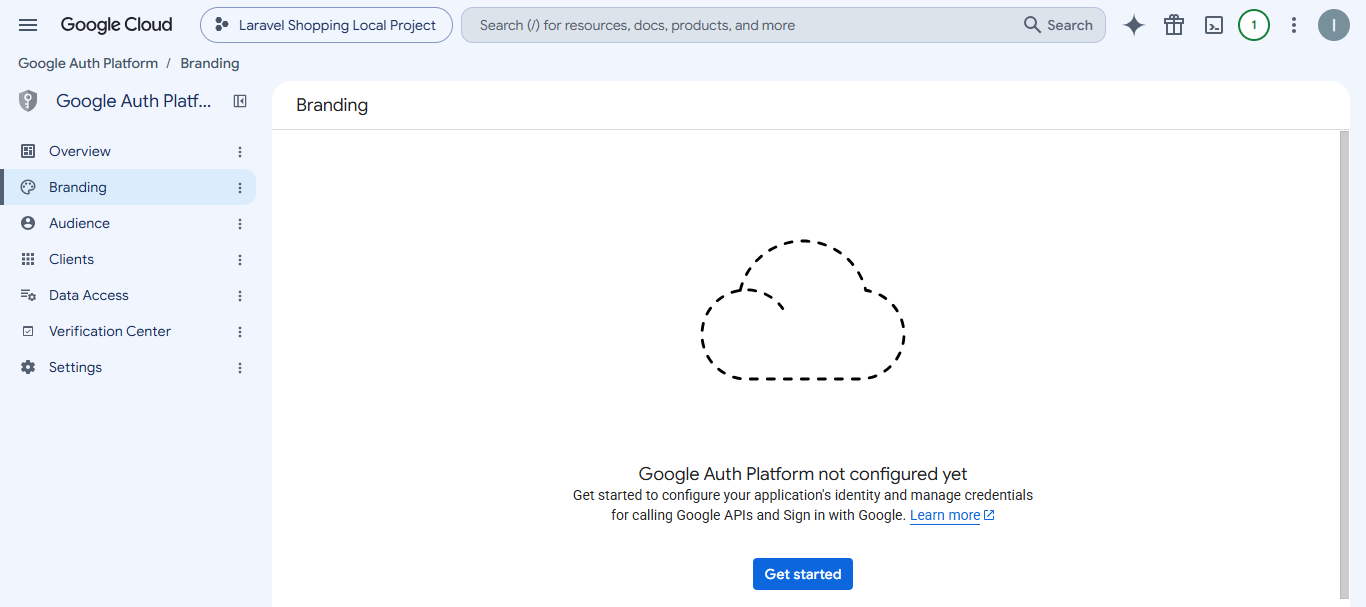
Screenshot 9: Start configuring the OAuth consent screen
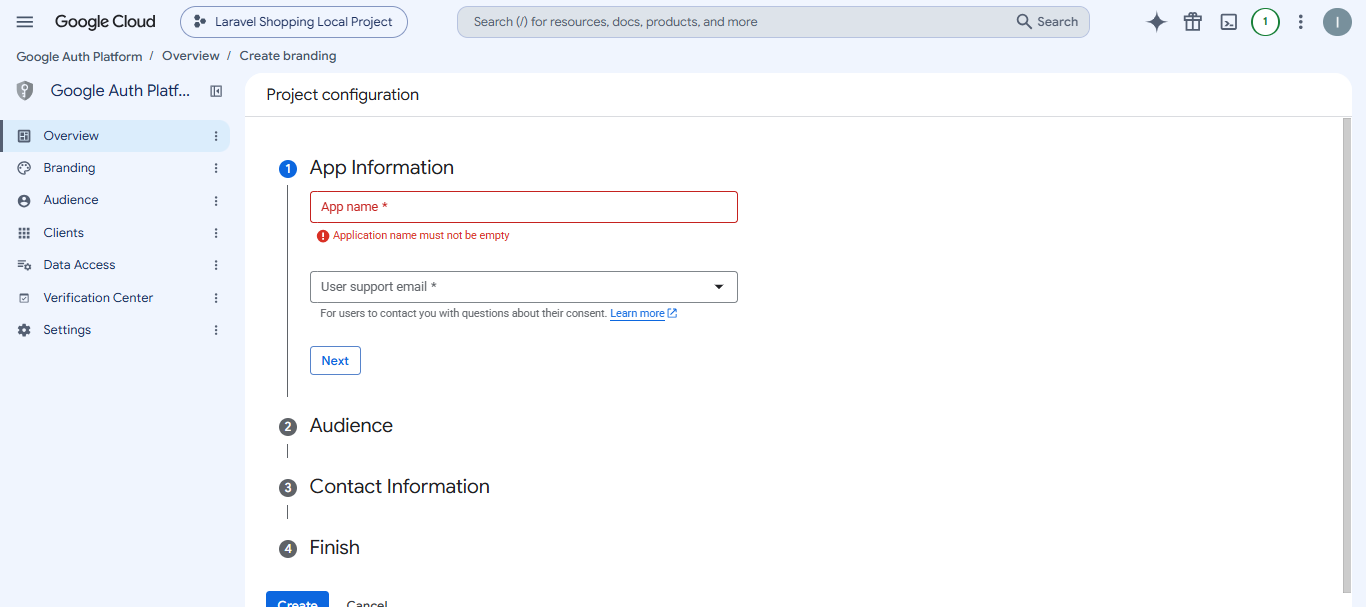
Screenshot 10: Configure the project information
-
Create an OAuth 2.0 Client ID for your application.
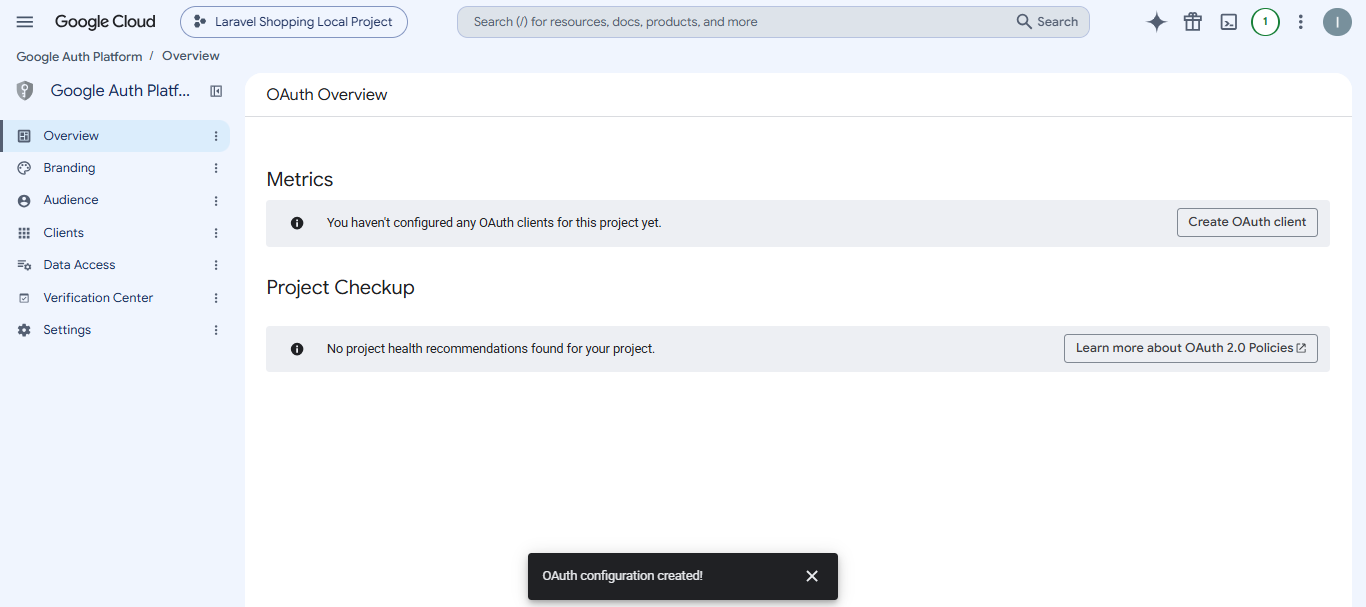
Screenshot 11: Create an OAuth 2.0 Client ID
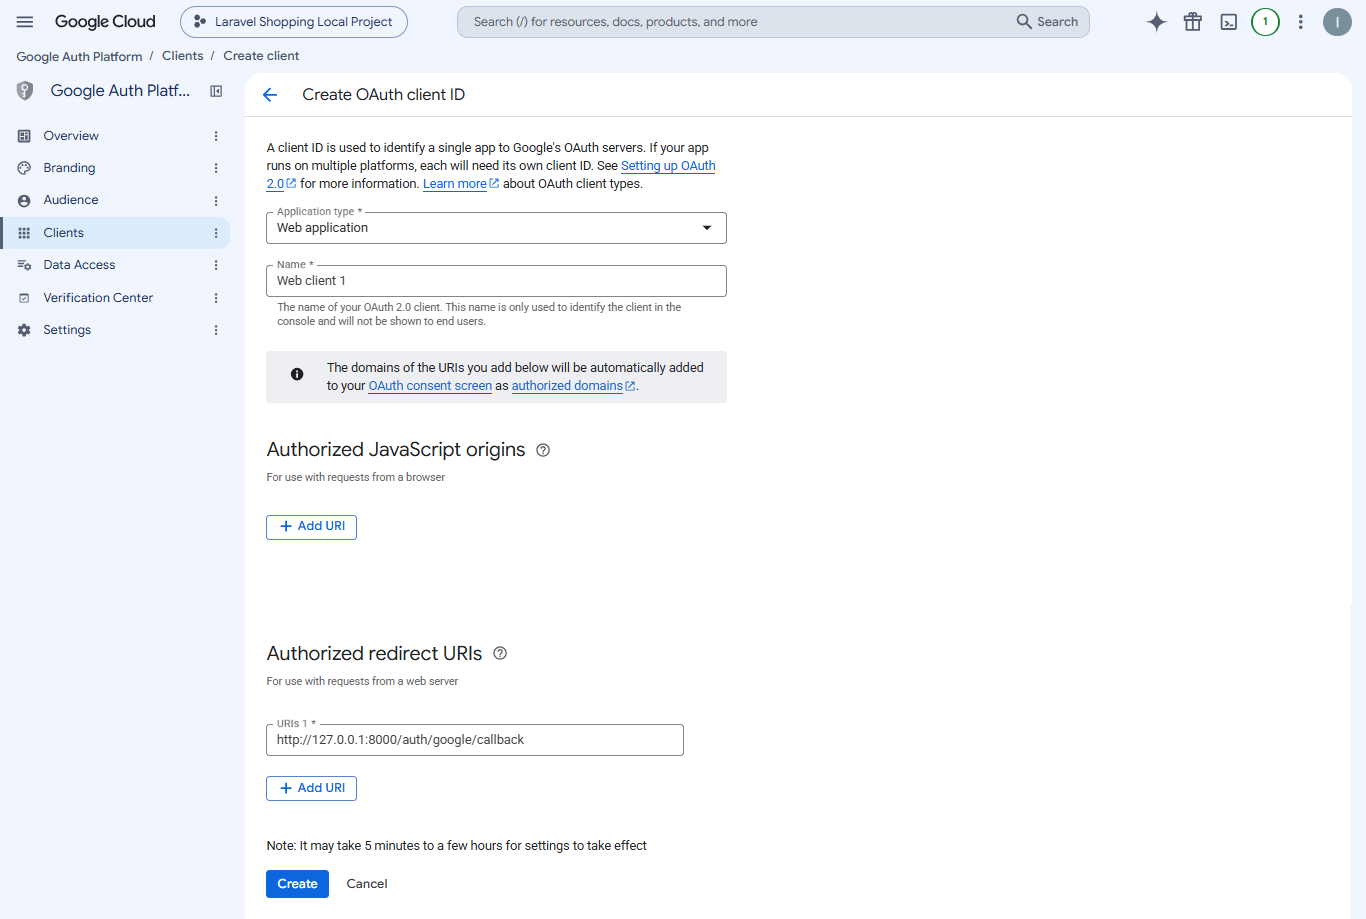
Screenshot 12: Configure the OAuth 2.0 Client ID
-
Under the Authorized redirect URIs section while creating the OAuth client, add the callback URL of your Laravel application as shown in Screenshot 12.
For example:
https://yourdomain.com/auth/google/callbackFor local development, if your application is running at
http://127.0.0.1:8000, the callback URL could be something like:http://127.0.0.1:8000/auth/google/callback -
After creating the OAuth client, Google will provide a Client ID and Client Secret. Copy these values because we will add them to the Laravel
.envfile.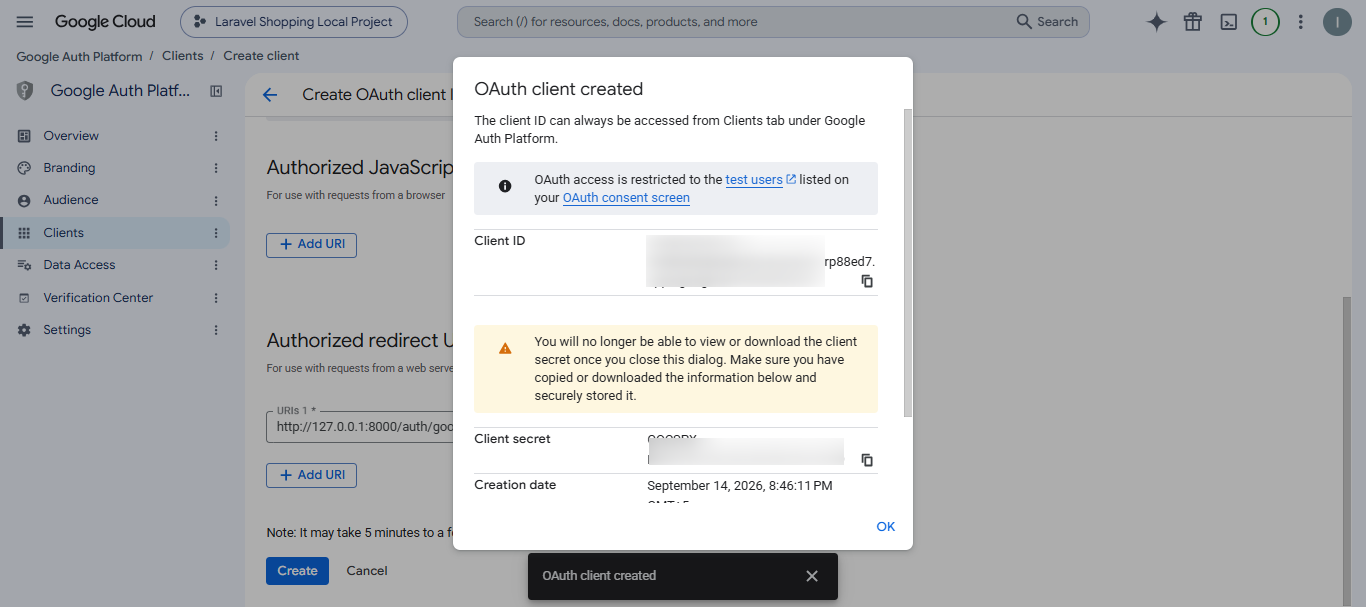
Screenshot 13: OAuth client created successfully
5. Add Google Credentials to .env
Open the .env file located in the root directory of your Laravel project and add the Google OAuth credentials:
GOOGLE_CLIENT_ID=your-client-id
GOOGLE_SECRET_KEY=your-client-secret
GOOGLE_REDIRECT_URI=https://yourdomain.com/auth/google/callback
Replace your-client-id and your-client-secret with the values generated in the Google Cloud Console.
If you are testing the application locally, make sure that the redirect URI in your .env file exactly matches the authorized redirect URI configured in Google Cloud Console.
6. Update the Users Table
We need to store the Google user ID in our database. To do this, we will add a google_id column to the users table.
Run the following Artisan command to create a migration:
php artisan make:migration add_google_id_to_users_table --table=usersOpen the newly created migration file and add the google_id column inside the up() method:
public function up()
{
    Schema::table('users', function (Blueprint $table) {
        $table->string('google_id')->nullable()->unique()->after('password');
    });
}
After updating the migration, run the following command:
php artisan migrateThis will add the google_id column to the users table.
7. Update the User Model
Since we will be creating or updating users using the google_id field, make sure that the field is included in the $fillable property of your User model.
Open app/Models/User.php and update the $fillable property:
protected $fillable = [
    'name',
    'email',
    'password',
    'google_id',
];
8. Create the GoogleAuthController
Now we need a controller to handle the Google authentication process.
Run the following Artisan command:
php artisan make:controller GoogleAuthController
Open the newly created GoogleAuthController.php file and add the following code:
<?php
namespace App\Http\Controllers;

use App\Models\User;
use Illuminate\Support\Facades\Auth;
use Illuminate\Support\Facades\Hash;
use Illuminate\Support\Str;
use Laravel\Socialite\Facades\Socialite;

class GoogleAuthController extends Controller {

    public function redirect() {
        return Socialite::driver('google')->redirect();
    }

    public function CallbackGoogle() {
        $googleUser = Socialite::driver('google')->user();

        // Check if the user already exists using Google ID
        $user = User::where('google_id', $googleUser->getId())->first();

        // If the Google ID does not exist, check using email
        if (!$user) {
            $user = User::where('email', $googleUser->getEmail())->first();
        }

        // Create a new user if no matching user is found
        if (!$user) {
            $user = User::create([
                'name' => $googleUser->getName(),
                'email' => $googleUser->getEmail(),
                'google_id' => $googleUser->getId(),
                'password' => Hash::make(Str::random(32)),
            ]);
        }
        else {
            // Store Google ID for an existing email account
            if (!$user->google_id) {
                $user->google_id = $googleUser->getId();
                $user->save();
            }
        }

        // Log the user in
        Auth::login($user, true);
        return redirect()->route('home');
    }
}
There are two important methods in this controller:
redirect() redirects the user to Google’s OAuth login page.
CallbackGoogle() handles the response received from Google after the user successfully authenticates.
The controller first checks whether the Google ID already exists. If it does not, it checks whether the user’s email already exists. This helps prevent duplicate users when an existing account uses the same email address.
9. Define Routes in web.php
Now we need to define the routes that will start the Google authentication process and handle Google’s callback.
Open routes/web.php and add the following:
    use App\Http\Controllers\GoogleAuthController;
    Route::get('auth/google', [GoogleAuthController::class, 'redirect'])->name('google-auth');
    Route::get('auth/google/callback', [GoogleAuthController::class, 'CallbackGoogle'])->name('google-auth-callback');
You can now create a login button or link that points to the auth/google route:
<a href="{{ route('google-auth') }}">Login with Google</a>
When the user clicks this link, they will be redirected to Google’s login page.
10. Test Google Login
Start your Laravel application and open the login page in your browser.
Click the Login with Google button. You should be redirected to Google, where you can select your Google account and authorize the application.
After successful authentication, Google will redirect the user back to the callback URL configured in your Laravel application.
The application will then find or create the user and log the user into Laravel.
11. Troubleshooting Common Issues
While testing Google Login, you may encounter some common issues. Here are a few problems and their possible solutions.
Issue 1: 400 Bad Request Response
If you receive an error similar to the following while trying to authenticate:
    Client error: POST https://www.googleapis.com/oauth2/v4/token
    resulted in a 400 Bad Request response
One possible solution is to clear the Laravel configuration cache.
Run the following command:
php artisan config:clear
Also verify that your Google Client ID, Client Secret, and redirect URI are correct and that the redirect URI exactly matches the one configured in Google Cloud Console.
Issue 2: Google ID Is Not Stored in the Database
If the user is redirected back to the login page and the Google ID is not stored in the database, check the following:
- Make sure the
google_idcolumn has been added to theuserstable. - Make sure the
google_idfield is included in the$fillableproperty of theUsermodel. - Make sure the Google callback is returning the expected user information.
Issue 3: Unique Integrity Constraint Violation
If you encounter a unique constraint error because the email address already exists in your database, make sure your authentication logic checks for an existing user by email before creating a new user.
The controller used in this tutorial first checks the google_id and then checks the email address. This prevents the application from creating another user with an email address that already exists.
Issue 4: Redirect URI Mismatch
If Google displays a redirect URI or redirect_uri_mismatch error, check the following:
- The redirect URI in your
.envfile. - The redirect URI configured in Google Cloud Console.
- Make sure both URLs match exactly, including
httporhttps, domain name, port, and path.
12. Conclusion
By following these steps, you have successfully integrated Google Login into your Laravel application using the Laravel Socialite package.
Google authentication provides users with a convenient way to sign in without creating and remembering another password. This can simplify the registration and login process, reduce friction, and provide a smoother user experience.
Laravel Socialite makes the integration relatively straightforward by handling much of the OAuth authentication flow, while your application remains responsible for finding or creating the corresponding user account.
With this setup in place, your Laravel application can allow users to securely sign in using their existing Google accounts.